Monday, November 20

Splunk - Quick Start Guide to Log Monitoring [Linux/Unix]


Start indexing your logs in 30 minutes!

This is a quick start guide for Splunk. Start indexing your logs from a remote server using Splunk forwarder. 

NOTE: If you are indexing up-to 500MB of logs per day, then you can use Free Splunk!

Setup

We would be installing Splunk on a master node [UNIX]. This will serve as the main Splunk server which will index the logs and display it via UI
The logs would be indexed from your remote application servers using Splunk Forwarder
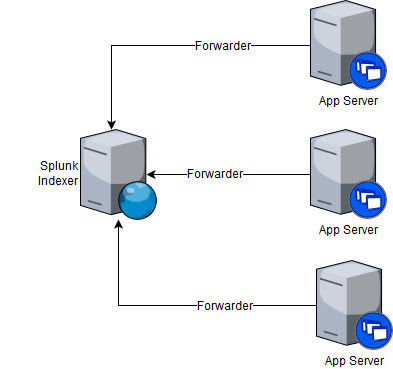

Diag.1 Setup

Installing Splunk + Indexer

Download the Splunk Setup files (.tgz) from here

On the UNIX Server:- 
  1. Extract the archive
    # tar -xvf splunk-7.0.0-xxxxx-Linux-x86_64.tgz
  2. Start Splunk
    # cd splunk/bin
    # ./splunk start
        (accept license agreement)
  3. Login to the UI and change default admin password!
Diag 2. First time login screen


Diag 3. Change password


That's it for the Splunk + Indexer setup.

You should not be able to view the UI

Setup forwarding

For Splunk to be able to receive data from the remote application servers, we need to setup Forwarding and Receiving

On the Splunk UI -
  • Go to Settings > Forwarding and Receiving

  • Configure Receiving > Add new

Now, we need to setup a port on which Splunk would listen. For this example, I am choosing 9997. Feel free to use any unused port (Tip: use netstat to check the ports in use)


In the next section, we would be setting up the forwarder to send data at this port

Install Forwarder (on Application Server)

Download the setup files (.tgz) from here
 
On the UNIX Server:

  1. Create a directory for splunkforwarder and extract archive
    mkdir /opt/splunkforwarder
    tar -xvf /path/to/downloaded/archive.tgz -C /opt/splunkforwarder

  2. Start splunk forwarder and enable it to start at boot
    cd /opt/splunkforwarder/bin
    ./splunk start --accept-license
    ./splunk enable boot-start

  3. Update Admin password
    ./splunk edit user admin -password [password] -role admin -auth admin:changeme
  4. Add forwarding to the main Splunk Server
    ./splunk add forward-server [splunk-hostname]:9997 -auth admin:[password]
  5. Add your log files to monitor
    ./splunk add monitor /location/of/log/file

That's it!

Thursday, November 9

[PART 2] Amazon Web Service - Start/Stop RDS Instance on schedule # Save Costs!

Last week I talked about scheduling start/stop of your Amazon EC2 instances to save costs.
You can read the post here.

Amazon charges for their instances on per-hour basis

So do you want to save costs be stopping your RDS Instances during the off-hours (nights, weekends etc.)?

This post is going to describe a fairly easy process for this setup using AWS Lambda and CloudWatch

Setup

We would be triggering a Lambda function from CloudWatch Scheduler which will in turn start/stop your RDS instances based on the Tags applied.

Diag 1: RDS Scheduler Setup

Note: First one million Lambda requests per month are free.

Let's jump to the process now...

Create an IAM Role for Lambda

In order to manage the RDS Instances using Lambda, we will have to create an IAM Role which we would later attach to the Lambda Function

  1. Under IAM Roles, select Create Role
  2. Select Lambda as the trusted entity for this role
  3. On the permissions page, select Create policy. This would open up a new window
    • Select Create Your Own Policy
    • Enter a suitable policy name and description
    • Enter the following JSON code in the Policy Document
    • {
          "Version": "2012-10-17",
          "Statement": [
              {
                  "Effect": "Allow",
                  "Action": [
                      "logs:CreateLogGroup",
                      "logs:CreateLogStream",
                      "logs:PutLogEvents"
                  ],
                  "Resource": "arn:aws:logs:*:*:*"
              },
              {
                  "Effect": "Allow",
                  "Action": [
                      "rds:StopDBInstance",
                      "rds:StartDBInstance",
                      "rds:Describe*",
                      "rds:ListTagsForResource"
                  ],
                  "Resource": "*"
              }
          ]
      }
      
      
      Validate and save the policy
  4. Now go back to the previous window (Create Role) and attach the policy you created to the role
    Note: If the policy is not visible yet, try refreshing the list
  5. Provide a suitable Role name and description on the review screen and create the role.

Create the Lambda Function

For this purpose, I would be using Python code inside Lambda using Python Boto3 libraries. Don't worry if you are not familiar with Python. The instruction here should suffice!

  1. Go to AWS Lambda Console and Create function
  2. For our purpose, we will Author from scratch
  3. Provide a suitable name to the Lambda Function and Choose an existing role (the one we have created in the last step)
  4. Diag 2: Lambda Function Definition
  5. Configure the Lambda Function with following details:
    Code entry type: Edit code inline
    Runtime: Python 2.7
    Handler: lambda_function.lambda_handler
  6. In the code block, clear out everything and add the code from the following URLs

    Stop RDS Instances
    Start RDS Instances

    NOTE
    • Python is indentation sensitive. Please be careful with the copy-paste
    • The script will action on the RDS instances with a specific tag (will setup this in next section)
    
    
  7. In the Basic settings, increase the timeout from 3 sec to 10 sec.
  8. Save the function.
Repeat Steps 1-7 for creating another function to Schedule Start of RDS Instances.

Setting up CloudWatch Trigger

In the Lambda Function, select Triggers tab and Add a new trigger

Select CloudWatch Events as the Source

  1. Create a new rule
  2. Specify appropriate Rule name and description
  3. You can enter schedule expression as per your need to invoke the trigger

    For Example:
    cron(00 23 ? * MON-FRI *)

    // This will invoke the Lambda function every Monday-Friday at 23:00 PM GMT
Diag 3: CloudWatch trigger setup

Tagging RDS Instance

The last and most simplest part of this setup is to tell Lambda which RDS Instances to stop/start.
This can simply be done by defining the following Tag in your RDS Instances

TAG1
Name: AutoRestart
Value: True

TAG2
Name: Environment
Value: Test

Diag 4: RDS Tagging


And that's it!!

Cheers!

Friday, November 3

Alexa Dev Perks!! US/UK/Germany/India

Amazon is giving away cool Alexa Perks. All you need to do is publish an Alexa Skill in November 2017 and fill out these forms

US - https://developer.amazon.com/alexa-skills-kit/alexa-developer-skill-promotion
UK - https://developer.amazon.com/en-gb/alexa-skills-kit/alexa-developer-skill-promotion
Germany - https://developer.amazon.com/de/alexa-skills-kit/alexa-developer-skill-promotion
India - https://developer.amazon.com/alexa-skills-kit/alexa-developer-skill-promotion-india

What's on the Plate??

Cool Alexa Limited Edition T-Shirt -- India Edition


Alexa Bauble and a change to Win Echo Dot and Echo Plus - UK/Germany Edition

Some of the good resources to kick-start the Alexa journey

A Cloud Guru - Alexa a Free Introduction - This is a great course to learn the basics and build some interesting skills.

Alexa Skills Kit Tutorials - Great Tutorials and resources provided by Amazon!

Cheers!